Monday, April 9, 2012

Bungalow Woodwork as It was Intended

First things first: My other house is finally under contract! Yippee! We close at the end of the month. It will be so nice to live with furniture again, not to mention not having to pay two mortgages. On the downside, it means that I have to finish the baseboards in the new (old) house before the end of the month. With P's help, I got the last piece of the kitchen scraped, sanded, primed and painted. P painted the baseboards in the guest room, which means I can set up bookshelves and move the boxes of books out of the sewing room and tackle the baseboards in there. The dining room looked like this Thursday morning:


Behind a phone jack, I noticed a patch of unpainted wood.


On further testing, I discovered that there appeared to be only one coat of white paint over the baseboards in this room. Baseboards in other rooms have had 5-6 coats of paint and 2 coats of wood putty on them. Could it be that I could actually bring the woodwork in this room back to its former glory? I scraped a little paint from the door trim, window trim and french doors and was rewarded with wood below all surfaces.

I got out the wood stripper and got to work.


After scraping the paint, I was left with this.


The remaining stain was really dark. The stain on the built-ins in the living room are also really dark. From research I've done, it doesn't appear that such dark stains were popular when bungalows were first built. The stain in my house was probably darkened at some point later. Some stain has dripped on the glass of the built-ins and the bricks appear to have been stained too. The bricks are actually sand colored which you can see by looking at the chimney from the outside of the house. Maybe I'm wrong and the dark stain is original, but I think it's just too dark, especially against the lighter floors.

After sanding (and sanding, and sanding, and sanding some more) and then digging white caulk out of all the dimples and cracks, I got down to this:


Isn't it pretty?!? I tested a couple stains.


On the left is Provincial, on the right is Dark Maple, both from Minwax. I think they are both too dark. I went back and got a couple lighter stains.
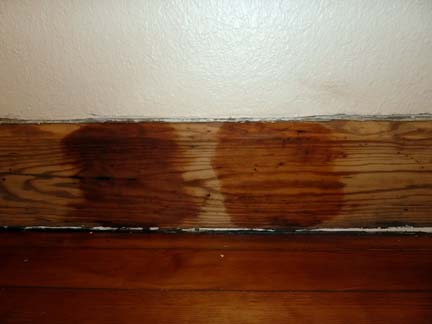

On the left is Cherry, on the right is Golden Pecan. The Golden Pecan matches the floor really well, so that is what I am going with. I'll probably do two coats and then a semi-glass clear coat.I like that you can see the wood grain through it.

Yesterday I refilled the dimples and cracks with Minwax stainable wood putty. Next, I'll sand it down, put on a coat of wood conditioner and the first coat of stain.

This is the piece after sanding off the rejected stain samples.

I just hope it comes out half as nice as the cabinets stained by A and G of Is It a House Yet?

At some point, I'll need to take down and strip the french doors (as well as the window and door trim). I hope the original door plates still look decent once all that paint is gone.


Mysterious Invisible Ice Bucket


Between the time my parents left (in January) and last weekend, the only improvements I made to the house were to add a few things to the bathrooms. In the guest bath, I purchased a caddy for the bathtub. Take a look at the instructions that came with it.


Yep, bathtub caddy and ice bucket. Why would you put an ice bucket in the bathtub? Needless to say, my bathtub caddy did not come with an ice bucket. At first, I thought the directions were translated to English by someone with an [insert foreign language here]-to-English dictionary, but everything else was clear and well written. I was so curious I looked up the product catalog. They really do make an ice bucket that hooks on the outside of the tub. I assume for champagne. Just how long do they think a girl can sit in the tub? Enough to drink more than one glass of champagne? And if there were two people in the tub, necessitating the whole bottle be brought along, I don't think they are just sitting there, sipping bubbly. . . at least I hope not.

In the master bath, the box of stuff sitting on the floor finally wore out its welcome. I broke down and bought a Better Homes and Gardens over-the-toilet spacesaver at Walmart. I can't imagine that Better Homes and Gardens has ever photographed a home with furniture from Walmart, but whatevs. It also had clear and well-written instructions. It took me about an hour to get it together.

This . . .


. . . is far superior to this:


Thursday, March 8, 2012

Rare shoulder-high dandelions spotted in urban yard

Roni swallowed by the jungle that was my backyard. She's the small white and brown spot in the middle.

I was the very last one on my street to break down and mow my lawn for the first time since winter. Well, the first time ever for me. I don't think there is actually any grass in my lawn, just weeds, but P said "If it's green, you gotta mow it." He asked me if I had a lawn mower at my old house. I said, "Yes. His name is Hector and I can no longer afford his services."  Somehow I don't think that's what P meant. ;)

Anyhow, I ordered a push mower for $99 off the internet, but it hasn't arrived yet, so P brought over his gas mower last weekend and mowed my lawn for me. The weeds in the front were waist high. The weeds in the back, shoulder high in places.

The photo above is before mowing but after I dug up all the dandelions. In the front yard, I needed a hand trowel to get them out. In the back, I needed a full-sized shovel. I kid you not, they were shoulder high.

I'm 5'7" so the dandelions had to be well over 4 feet tall.
I had no idea they could grow so gigantenormous! And there were so many of them!

Giant pile o' dandelions

Now that's it's been mowed, I can actually see the yard. Roni seems really happy too. I don't blame her. Traversing a weed forest in order to pee was probably not fun. Today she spent most of the day sunbathing in the "grass."


There were a few wildflowers that I didn't pull. don't know what they are but they're pretty.


I found a few odds and ends--some old rusty metal pieces, a piece of pressed glass with flowers and a few checkerboard tiles. I wonder if they used to be in the house. They're kind of cool. Not photographed was a piece of glass so old it turned purple and an iron half sphere about an inch in diameter. They accidentally got thrown out. Apparently not everyone can tell the difference between trash and treasure.

Yard treasures.

There are also a few weird concrete leftovers. One has traces of green paint on it and the other has old rusty pieces of metal coming out of it. I wonder what they were? Maybe an old playset?

Concrete with embedded rusty metal pounded flat

What was it?

 Here is the front yard neatly mowed.


And a close up of the flowers my mom planted last month and a few surprises that showed up in the front yard.

Still healty!
I have a rose bush!
And irises! I love irises!
I'll close with a few photos I took from my back deck of the beautiful sunset the other night.


Thursday, February 9, 2012

A Few Before and After Photos

My parents came to visit a few weeks back. I got a ton of work done in preparation for their visit and a ton done while they were here. First let's look at what the guest bedroom looked like on the day I got the keys.


The walls were light blue and filthy. The wall opposite of what you see here was dark brown--so dark it was almost black. And, of course, the ceiling was blue as well and there was no light fixture.


Here is a photo with the ceiling painted and brown walled primed during the phase when I was using the room for storage.

I really love that light.
 All that stuff had to come out so the room could be painted and so my parents could use it during their stay. Here is the room now.

I think maybe I need to get a second comforter...

The walls are Benjamin Moore Wyeth Blue. The velvet headboard and bench (Craigslist!) will go into my room once I reupholster them.  The baseboards have been scraped, sanded, primed and the shoe molding attached. I still need to throw a coat of paint on them.

Speaking of baseboards, let's take a look at just how bad they were. Here are some close ups from the kitchen.

Original

Scraped

Sanded
Primed
 It's a lot of work. After priming, the shoe molding was attached and then they were painted with oil paint. Here's a photo with the finished baseboards and a full-sized fridge I'm borrowing from P.


Up to now, I've been using this.


 P also got my stove top working and fixed the broken door! Remember this?


Behold!


The oven still doesn't work, but the burners do. Yippee! Now I need to order replacement knobs and a manual. New parts can still be purchased since these stoves have so many fans. Hopefully the manual will help me figure out how to fix the oven.

One of the things my dad did while he was here was get all the grout and glue off the kitchen counters. This is what they looked like before.


And now.

And finally I'll leave you with the living room. Here's the photo from when I took possession.

And now.


Next steps are to do the baseboards and then strip the paint from the two windows next to the fireplace. If anyone has suggestions for what I could use instead of the ugly brass fireplace screen, let me know.

Friday, January 13, 2012

Something's Amiss, But It's Not the Toilet


There is no longer a toilet in my living room! It is safely back in the bathroom, where it belongs. I finally finished sanding, priming, painting, and installing shoe molding on the baseboards in the bathroom so everything is back where it was and in working order.
 

Well, almost everything is back where it was. Here is the view from sitting on the not-in-the-living-room toilet.

The sink has built-in towel racks!

Let's take a closer look.


Do you see something that isn't quite right? When P and I went to rehang the sink, we were missing the chrome u-bend. It just disappeared. I don't know where it could possibly have gone. He happened to have a brass u-bend in his garage that fit, so on it went. The plan was to get a chrome one next time I went to Home Depot, but it's kind of growing on me. It makes me giggle. It doesn't match. Hee hee. Why is that funny? Maybe this never-ending project is getting to me because for some reason a gold u-bend on a chrome sink strikes me as sadly hilarious. I'm sure I'll replace it someday. Instead, the next time I went to Home Depot I bought a wall plate to hide the big hole where the pipe goes into the wall. I haven't installed it yet.

What else is left on the to-do list for the bathroom?

Level the tub so the water actually drains. It should be on a slight incline towards the drain, but instead it's on a slight incline the other way. Currently, after it's used, about 2-3 inches of water have to be scooped up the length of the tub and into the drain. The feet are adjustable, the bitch will be lifting one side of the heavy beast in order to adjust them.

Strip, sand, prime and paint the window and door trim and the medicine cabinet.


Wash out all the dust, then sand, prime and paint the top half of the cabinet. The top shelf, which had been sealed shut, is all nasty and moldy. I sprayed it with bleach a few times but the mold is still there. I'm hoping the can of Killz lives up to its name. I wonder if it was sealed because it was too high to reach and the mold developed later, or because someone else was too lazy to get rid of the mold.

Disgusting!
 I really, really don't like the cabinet at all. It is clearly not original to the house. It takes up a lot of space and crowds the sink and mirror on one side and the tub on the other. I had to take the door off the bottom so it could be usable at all. The sink prevents the door from opening. It was nailed shut when I bought the house. And on top of everything else, it's really ugly. I can't decide whether to remove the top door too for consistency, or leave it on to hide clutter. Eventually I'll rip it out the whole thing and replace it with a nice free-standing cabinet like this one from Restoration Hardware. But probably not that exact one...unless I win the lottery.

Simple, elegant, clean. No mold anywhere.