Thursday, May 10, 2012

House Bath, New Gate Underway and Historical Fences


I had the house pressure washed yesterday in preparation for (eventual) painting . . . and because it really, really needed it.  I’ve posted other photos of the front of the house. From far away, it doesn’t look bad. 


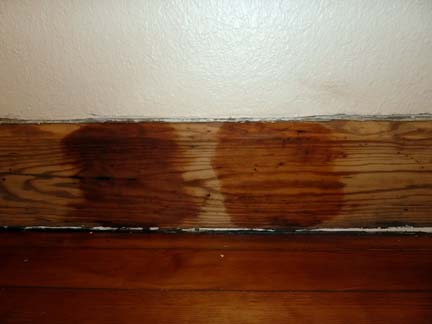
But up close . . .


Ew! And that wasn’t even a particularly bad spot. It looks SO much better now.


I have been thinking about exterior colors since I bought the place. The neighborhood is full of colorfully painted craftsman bungalows. I plan to do a tour for you soon because they are really worth seeing. I want my house to look cheerful and fun, but not obnoxious. I love light turquoise, but the house across the street from me is turquoise. Next to it is a yellow house, then a green. It might look weird to have turquoise houses across the street from one another. 

But what color can I paint that isn’t going to be boring, or make me look like a copycat? Red and purple are out. I thought about pale grey with turquoise trim, but I don’t think it will look cheerful enough. 

Today I had the thought to go ahead and paint it light turquoise like I originally wanted, but paint some of the trim (not all) a deep salmon/coral/terra cotta color. The rest of the trim will stay white. What do you think?

Benjamin Moore's Palladian Blue and Dark Salmon

In other (awesome) news, P is building me a beautiful craftsman gate. The existing gate is three feet tall and chain link. Roni in her younger days could leap six foot gates in a single bound. She’s older now, but a three foot gate is not enough to discourage wandering. P had a five foot width of something like chicken wire that we rolled out next to the gate and secured it with metal ties. It’s kept her in the yard so far.


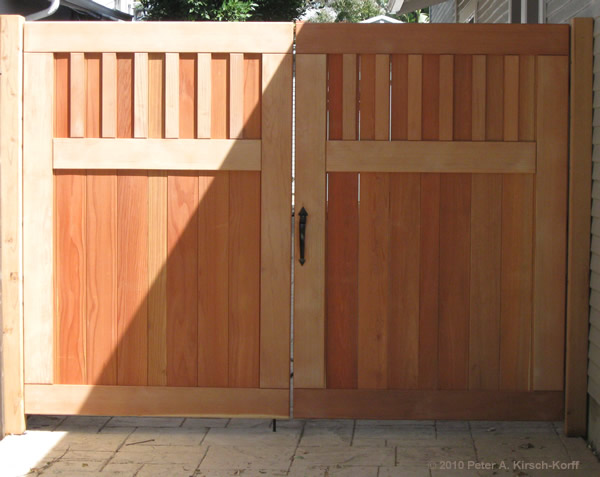
I don’t think P knew quite what he was getting into when he said he’d build me a gate. No plain picket gate would do for my craftsman bungalow. These were the photos I showed him of what I wanted.
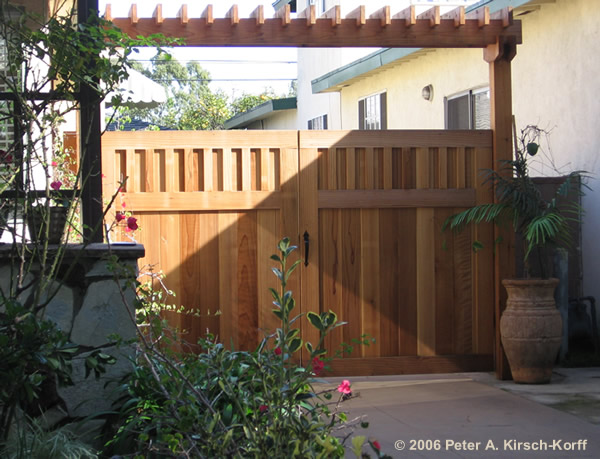
Gate design by Kirsh-Korff

Gate design by Kirsh-Korff
Here is my gate under construction.


It’s made of Texas red cedar and smells amazing! This is the back side of the gate. The back side of cedar is rough, the front is smooth. The front of the gate is smooth and there are no nail holes showing at all. It’s so, so pretty and it doesn't even have the small pickets at the top yet. The weather is not cooperating  today so my gate will have to wait to be completed. Once hung, it will be stained similarly to the one in the inspiration photo.


You can see that the fence along the south side of the property is in pristine condition. When P removed a few boards to sink the post for the gate, he discovered the remains of what was probable the original fence.

The metal bar and twisted wire are the old fence. The wide boards are the current crappy fence.

If you look closely you can see the twisted wire that used to hold the wooden pickets—now completely rotted away. I will replace this fence at some point but for now it keeps Roni from checking out the neighbors yard.


Friday, April 27, 2012

Coils and Bricks


I mentioned earlier that I thought the bricks in the living room fireplace may have been stained because the original bricks visible in the attic are sand-colored. Now I’m not so sure. Here is a photo of the chimney of the walled-in fireplace, viewed from the attic. Those bricks are definitely sand-colored.

There is a ton of crap in the attic left by the previous owner.

 I couldn’t see the chimney of the living room fireplace from where I stood. Maybe the builders used two different kinds of brick? But why would they? Here is a close up of the living room brick. What do you think? Is the color original, or has it been stained? I think I will try scraping a tiny area and see what it reveals.


As for my air conditioner, it appears to be fixed. When the coil was opened, there was enough hair covering it to make a medium-sized dog. It may have been sabotage by the previous owner. It appears she ran the A/C without a filter from the time she found out she was being foreclosed upon. I know she had four dogs. Four dogs and about four months with no filter equals this.

Gross! Look at all that fur!

But at least I didn’t have to get a new coil or whole new unit. $305 for four visits from the repairman isn’t too bad.

Tuesday, April 17, 2012

Restored Baseboards Almost Done

Here are the baseboards after three coats of golden pecan. By the way, stainable wood putty is not stainable, no matter what the can says.

After two coats of polyurethane.


The shoe molding didn't take the stain as well. After four coats they matched the floors pretty well, so I decided that was good enough.


I was worried the baseboards were going to turn out too rustic. You can definitely see signs of age--dark spots, mottling, etc. Or perhaps I just did a bad job of removing all the dark stain. Once P applied the shoe molding and the remnants of white paint were covered, they look pretty good. Not perfect, but an old house should have character. I'm pretty happy.


I need to give them a light sanding and one more coat of polyurethane and they'll be done!
What do you think?

On a different note, check out the big hole in the wall in the photo below. That's the access to the area below my (broken) air conditioner. The former hall closet was turned into an A/C closet at some point in the past.


They never removed the carpeting. When my A/C decided to leak all over the place, it got the gross, old carpeting all soggy and even more gross.

You can see the unpainted baseboards on the inside of the "closet."
I've had a fan blowing in there trying to dry it out. The repairman is coming back Thursday. This will be the 4th visit. He is going to try to clean my (apparently dusty) coil and see if the drain pan is cracked. This could be a $300-$500 problem or a $1,500-$6,000 problem. Wish me luck!

Monday, April 16, 2012

Floorplan Rendering

In order to figure out what furniture will fit in my house, I created a scale rendering. First I measured all the rooms, then I drew it out. I am pretty pleased with it. There are a few places that I didn't take measurements of--like the walled-in fireplace and the closet in the guest room--so I just fudged those areas.


Things are coming along, which is good. However both my air conditioner and clothes dryer broke this weekend. Ugh! I'll let you know how it all turns out. I don't want to shell out the dough for a new dryer if I'm going to have to spend a ton of money to get the A/C fixed.

Monday, April 9, 2012

Bungalow Woodwork as It was Intended

First things first: My other house is finally under contract! Yippee! We close at the end of the month. It will be so nice to live with furniture again, not to mention not having to pay two mortgages. On the downside, it means that I have to finish the baseboards in the new (old) house before the end of the month. With P's help, I got the last piece of the kitchen scraped, sanded, primed and painted. P painted the baseboards in the guest room, which means I can set up bookshelves and move the boxes of books out of the sewing room and tackle the baseboards in there. The dining room looked like this Thursday morning:


Behind a phone jack, I noticed a patch of unpainted wood.


On further testing, I discovered that there appeared to be only one coat of white paint over the baseboards in this room. Baseboards in other rooms have had 5-6 coats of paint and 2 coats of wood putty on them. Could it be that I could actually bring the woodwork in this room back to its former glory? I scraped a little paint from the door trim, window trim and french doors and was rewarded with wood below all surfaces.

I got out the wood stripper and got to work.


After scraping the paint, I was left with this.


The remaining stain was really dark. The stain on the built-ins in the living room are also really dark. From research I've done, it doesn't appear that such dark stains were popular when bungalows were first built. The stain in my house was probably darkened at some point later. Some stain has dripped on the glass of the built-ins and the bricks appear to have been stained too. The bricks are actually sand colored which you can see by looking at the chimney from the outside of the house. Maybe I'm wrong and the dark stain is original, but I think it's just too dark, especially against the lighter floors.

After sanding (and sanding, and sanding, and sanding some more) and then digging white caulk out of all the dimples and cracks, I got down to this:


Isn't it pretty?!? I tested a couple stains.


On the left is Provincial, on the right is Dark Maple, both from Minwax. I think they are both too dark. I went back and got a couple lighter stains.


On the left is Cherry, on the right is Golden Pecan. The Golden Pecan matches the floor really well, so that is what I am going with. I'll probably do two coats and then a semi-glass clear coat.I like that you can see the wood grain through it.

Yesterday I refilled the dimples and cracks with Minwax stainable wood putty. Next, I'll sand it down, put on a coat of wood conditioner and the first coat of stain.

This is the piece after sanding off the rejected stain samples.

I just hope it comes out half as nice as the cabinets stained by A and G of Is It a House Yet?

At some point, I'll need to take down and strip the french doors (as well as the window and door trim). I hope the original door plates still look decent once all that paint is gone.


Mysterious Invisible Ice Bucket


Between the time my parents left (in January) and last weekend, the only improvements I made to the house were to add a few things to the bathrooms. In the guest bath, I purchased a caddy for the bathtub. Take a look at the instructions that came with it.


Yep, bathtub caddy and ice bucket. Why would you put an ice bucket in the bathtub? Needless to say, my bathtub caddy did not come with an ice bucket. At first, I thought the directions were translated to English by someone with an [insert foreign language here]-to-English dictionary, but everything else was clear and well written. I was so curious I looked up the product catalog. They really do make an ice bucket that hooks on the outside of the tub. I assume for champagne. Just how long do they think a girl can sit in the tub? Enough to drink more than one glass of champagne? And if there were two people in the tub, necessitating the whole bottle be brought along, I don't think they are just sitting there, sipping bubbly. . . at least I hope not.

In the master bath, the box of stuff sitting on the floor finally wore out its welcome. I broke down and bought a Better Homes and Gardens over-the-toilet spacesaver at Walmart. I can't imagine that Better Homes and Gardens has ever photographed a home with furniture from Walmart, but whatevs. It also had clear and well-written instructions. It took me about an hour to get it together.

This . . .


. . . is far superior to this: